Sharpen Instead Of Replacing!
Familiar with the quote “a dollar saved is a dollar earned”? Some call it being cheap, others call it being wise. Call it what you want, but one thing is certain: all the dollars saved today, will add up tomorrow! That’s precisely why I choose to sharpen my tools instead of replacing them. You should follow suit!

It’s all well and good that we’ve decided to sharpen our tools, but care must be given to ensure it’s done properly. That being said, we’ll talk about a couple different ways of how to sharpen a pizza cutter, but for now let’s try to understand what exactly needs to be sharpened.
A Closer Look At The Pizza Wheel
Take a closer look at your pizza wheel. What do you notice upon inspecting the cutting edge? You should see that there is a single surface/bevel that has been ground down at an angle to form a cutting edge. This surface/bevel is what we will be sharpening.


There’s several different ways to sharpen a pizza wheel, from using a bench grinder to polishing with sandpaper. If I am to use any of these methods, 2 things must check off:
- It Should Be Easy—I see no value in turning on my bench grinder just to sharpen a pizza cutter. I need something that’s easy, and can be done relatively quick…which brings me to my next point!
- It Should Be Quick—“I spent Saturday trying to sharpen my dull pizza wheel” said no one ever. Sharpening pizza wheels need not be a long, grueling process!
The 3 methods below take only a couple minutes, and can be done by anyone!
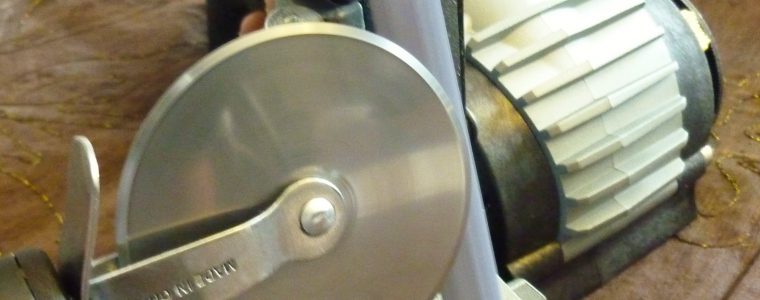
#1 Use The Ken Onion Work Sharp
I’d like to start off by saying I did not discover this method. All credit to Doug Holser from Work Sharp for providing an informative video on YouTube. Below is the original video from Doug. I encourage you to check it out!
For those who aren’t familiar with the Ken Onion, all you need to know is that it’s one of the best electric sharpeners you can find. I’ve done a comprehensive review on the product which you can read by clicking here. To check out latest pricing on amazon, click here. Since I actually own one of these sharpeners, I figure why not put Doug’s method to the test. Below are the steps I took, along with my final results!
Step 1: Setup & Grit Install/Alignment
If you own one of these, you’ll know setup is cut and dry. All that really needs to be done is installing and aligning a belt grit. I’ll be using the finest grit at my disposal: a 6000 grit extra fine belt. Removing and installing a belt is straightforward (it comes right off!). To align, you need to run the motor and simultaneously adjust the alignment switch, until you feel the belt is properly centered/aligned.


Step 2: The Actual Sharpening
Alright, time to see if this actually works! I’ll be using a low speed setting for the belt rpm, as my goal is to remove minimal steel. As far as sharpening is concerned, I’ll be doing the ground bevel/surface for a total of 2 minutes. 2 minutes is long enough to ensure thorough sharpening of the entire edge. Once this is done, i’ll flip over to the other side and do 30 seconds to get rid of any burrs raised. Since the rotating belt drives the pizza wheel to spin, I will refrain from manually rotating the wheel by hand.


Step 3: Moment Of Truth!
Here’s the part where you get to see how horrible/awesome of a job you’ve done. Before you attempt to slice a pizza, remember to thoroughly wash the cutter. The process of sharpening results in accumulation of steel dust around the cutting edge surfaces; washing under water helps to get rid of this dust. If you’re not getting the results you desire, don’t fret! Sharpening is one of those things that requires practice to master. Be patient and eventually you’ll get the hang of it.
#2 Use A Handheld Pull Through Sharpener

There’s one product in particular that stands out: Accusharp 001C. I’ve written a full blown review on the product which you can read by clicking here. If you wish to check latest pricing on amazon, click here. You don’t need to have this exact product, any handheld pull through should work fine really. I suggest the Accusharp because it’s an awesome, cheap little tool that’s useful for many things.
The actual sharpening is a breeze! Here’s what I would do:
- Make a pen mark (or stick a piece of tape) anywhere on your cutting edge. This is your reference point, or the point where you start sharpening.
- Now using the pull through, swipe/trace the entire wheel starting at the reference point.
- Complete a total of 5 revolutions.
- Give it a try, and determine if more revolutions are required!
#3 Abrade With Sandpaper
If you’re looking for the cheapest way how to sharpen a pizza cutter, it’s this! My advice to you: make a run to your closest home improvement store and get your hands on coarse, medium, fine and extra fine grit sandpaper. Trust me, you’ll thank me after using this stuff as much as you will!

Sharpening using sandpaper is not rocket science, but it does take a while because the process is done entirely by hand. There’s different ways to do it, but the way I use sandpaper to sharpen is as follows:
- Cut Into A Napkin Size—It’s easier to work with a small piece of sandpaper, so I typically cut out a section (about the size of a napkin).
- Abrade Along The Cutting Edge—This step is crucial. Always abrade along the cutting surface, not against! The picture below shows the direction you should follow. Ensure this is done for the entire wheel a total of 3 times.
- Repeat step 2 one single time, but on the other side of the cutter. This will get rid of any burr.
- Wash and give it a test!
Important: Avoid using a coarse grit unless your cutter is absolutely dull as dirt. For the most part, you’ll want to stick to fine and extra fine grits. Capiche?
What’s Worked For You?
I’ve shown you 3 different ways how to sharpen a pizza cutter. If I had to pick a favorite from the 3, I’d pick #1 (i.e. using the Ken Onion). It’s by far the quickest, easiest and most effective method. However, I encourage you to pick whatever suits your needs. I don’t suggest you splurge on an electric sharpener just for the purpose of sharpening a pizza wheel!
Having said that, I hope you found this post useful. If you did, consider sharing on the socials as a token of your appreciation. Lastly, for those of you with experience in sharpening pizza cutters, what’s worked for you? what’s your favorite method and why? do you do things differently from me? Leave me a comment and let’s get a discussion going!