A Quick Intro On Angles!
Most of you who are new to knife sharpening (and this blog) are probably wondering “well, what’s the angle?”
Many people have difficulty understanding knife angles, but it’s really quite simple when you think about it!
When I think of knife angles, I think about it in 2 ways:

Japanese knives usually have a much tighter angle in comparison to their western counterparts; 12-15 degrees in comparison to 20-22 degrees. As such, Japanese knives are blazing sharp!
The downside to this of course is that they’re much more susceptible to nicks and chips. If you’re using the knife to cut into hard materials, this becomes especially important to think about. It doesn’t take much impact to destroy a “thin” edge.
And so much thought must be given as to what angle you choose to sharpen your knife to. The folks at sharpening supplies have done an incredible job explaining angles in greater detail. Here’s an article you should definitely check out!
To conclude: every knife in your collection has a different purpose. Kitchen knives will be used to cut into meats and vegetables, whereas pocket knives will be used for tougher tasks such as whittling or cutting wood.

Pay close attention to these nuances and pick an appropriate sharpening angle!
What Is A Knife Sharpening Angle Guide Anyways?
A knife sharpener angle guide is simply a tool to help you sharpen your knife at a particular angle. If you decided to sharpen your western knife at the same angle 20 degree angle it was ground to, then you would use a 20 degree angle guide. On the contrary, if you decided to transform your western knife to a much thinner 15 degree edge, you would use a 15 degree angle guide. Get the gist of it? Pretty simple right!
Angle guides are not sharpeners!
Angle guides are tools to help you sharpen; you use them in conjunction with a sharpening stone.
My 3 Favorite Knife Sharpening Angle Guides!
There’s plenty of different angle guides available online, so I’ve narrowed down a list of my favorite 3. Let’s look at each one in more detail!
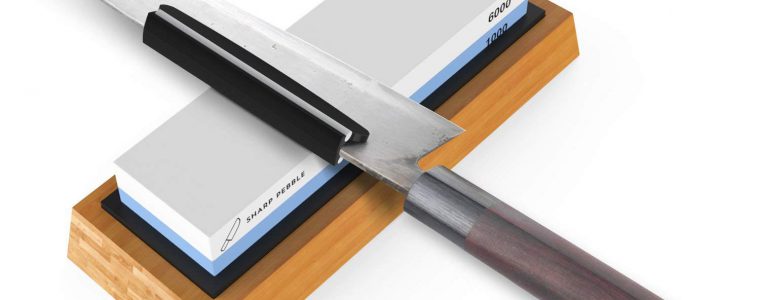
#1 Whetstone Knife Sharpening Angle Guide (By Sharp Pebble)
A simple guide that’s easy to use and flexible for most knives (although it does have it’s limitations, more on this later!).
How Does It Work?
This type of angle guide slides right onto the spine of your knife. Ideally, you should aim to have it sit at an equal distance from the heel and tip. In other words, ensure it’s centered along the length of the blade. That’s pretty much it. You’re now ready to start sharpening on stone without having to worry about maintaining a consistent angle!
All The Positives! (Pros)

My favorite thing about this particular style of angle guide is that it’s foolproof. Anyone who knows nothing about knife sharpening can use this and probably still achieve average to decent results, even if they don’t have a clue of what they’re doing!

Setup should take less than a minute, if done correctly. There’s no messing around trying to guesstimate angles as you normally would in freehand sharpening. A great tool to have on the go, especially if you need to restore a quick bite to your edge!

Cool thing about this guide is it maintains angle consistency throughout the entire process. Because it’s attached to your knife, it keeps the sharpening angle consistent at all times. As you’ll see in our next review, not all angle guides have this benefit!
All The Negatives! (Cons)

The drawback with this sort of angle guide is that it can only maintain a single angle. The angle it will maintain is dependent on the knife being sharpened. The manufacturer suggests this angle is anywhere from 15 to 20 degrees. For most people a single angle is sufficient, but if you’re looking for more, this angle guide will probably fall short of expectations.
#2 Wedgek Knife Sharpening Angle Guides (10-20 Degrees)
A set of 11 individual wedge angle guides ranging from 10-20 degrees. Right off the bat, these guides are quite a bit different than the one above!
How Does It Work?
First and foremost, you need to decide on a sharpening angle. When you do, pick the appropriate wedge piece. You have a choice of anything from 10-20 degrees in 1 degree increments. Use the elastic rubber band provided to strap the wedge to your sharpening stone. As you perform sharpening strokes, ensure your knife is parallel to the wedge slope, and at the same angle. And that’s basically it!
All The Positives! (Pros)

Unlike the previously discussed angle guide in #1, the Wedgek system comes with 11 different wedge pieces. Each of these wedges are sloped at a specific angle. The 11 wedges provided allow you to sharpen anywhere from 10 to 20 degrees in 1 degree increments. This sort of flexibility isn’t something we saw earlier where you just have a guide set to one angle. A massive advantage in my opinion!

Pick your wedge based on what angle you want to sharpen to, secure it to your sharpening stone using rubber band, and away you go! All in all, setup should take about 1 minute, maybe even less. Another cool thing with these wedge pieces is that they’re small enough to comfortably fit majority of stones. In case you’re wondering, each wedge is 1.5 inches long, 7/8 inches wide, and 5/16 to 9/16 inches high.

The slip on style angle guide discussed in #1 has a tendency to rub or abrade against the stone as you sharpen your knife. Over time this can potentially result in chips or low points on the stone surface, and If there’s one thing that you don’t want, it’s a stone that isn’t uniform! That being said, you don’t see this issue with the Wedgek guides, and that’s because they remain in one position at all times.
All The Negatives! (Cons)

My biggest concern with the Wedgek angle guides is that they don’t maintain a continuous sharpening angle. You get your angle at the start of the sharpening stroke, and that’s it. This is very different from the guide discussed in #1 where an angle is maintained basically at all times of the sharpening process.
#3 Yosa Knife Sharpener Angle Guide
Another non adjustable angle guide that’s quick, easy to use, and very reasonably priced!
How Does It Work?
Just like the guide discussed in #1, this angle guide from Yosa slides on and attaches to a knife’s spine. That’s all there really is to it. Once properly attached, you’re ready to sharpen by stroking the blade back and forth against the stone.
All The Positives! (Pros)

If you own a traditional Japanese knife and aren’t sure how to properly sharpen on stone, you should seriously consider this. Why? It’s set to maintain an angle of about 15 degrees. This is what most Japanese knives are set to, so if you want to restore the factory edge, get this guide!

Not that knife sharpener guides are gonna put a dent in your wallet by any means! But hey if I can save a couple dollars, i’m game! For those of you who’ve been following my blogs, you know I love me a good deal! I’ll leave a link at the bottom where you can check out the latest pricing on Amazon.

Measuring 3.9 inches long, 0.8 inches wide, and 0.4 inches high, this is a nifty little tool to have kicking around in your kitchen drawer. Small enough to neatly tuck away in your drawer with the rest of your cutlery. Also small enough to carry with you on long trips!
All The Negatives! (Cons)

The only drawback with this style of angle guide is that it’s restricted to one angle. In a sense, it’s not versatile. This is the same issue we found with the angle guide in #1. Maybe this won’t be a problem if all the knives you own are set to 15 degrees, and you only care to sharpen at 15 degrees. For most people, this won’t be the case of course. You likely own a plethora of different knives ranging from kitchen knives to pocket and maybe even hunting knives!
3 Alternatives To Not Using An Angle Guide!
Angle guides are great for beginner sharpeners, but they’re by no means a necessity. Here’s 3 alternatives to using a knife sharpening angle guide!
#1 The 90 Degree Rule!
By far one of the quickest and easiest methods to help you sort out your angles. How does it work?
I talk about this method in great detail in an instructable I wrote not too long ago. You can check that out by clicking here. Best thing about this method….it costs nothing!
#2 Chad’s Magic Angle Finder
Chad’s Magic Angle Finder is a quick and easy technique developed by Chad over at ChadWrites. You can check out Chad’s complete method by visiting his blog here, but I’ll quickly outline the steps below as well. To make things nice and easy, let’s look at a specific example:
It sounds a lot more complicated than it is, but that’s not the case. Yes you might need a ruler the first couple times, but once you nail it down, it should become muscle memory!
All credit to ChadWrites
#3 The Coin Trick!
You can use Chad’s Magic Angle Finder with coins. How does it work?
Essentially you follow steps 1 & 2 above exactly, and then use a coin of known height instead of a ruler. Chad uses quarters in his example. He uses 7 quarters to make up a total of half an inch!
Stack em up!
Coins are nice because they can be left on the stone and used as required. Once you’ve practiced a few times, you’ll know right away how many coins you need for a specific angle. Eventually, it’ll become second nature!

Who Should Buy One?
Knife sharpening angle guides are the perfect tool for anyone new to freehand sharpening. Specifically, there are 2 types of people who ought to consider these tools:
If you’re any one of the 2 listed above, an angle guide could help with sharpening. On the contrary, if you have no difficulty maintaining a constant angle every time you sharpen on stone, you have no need for angle guides!
To Conclude….
Here are the 4 main takeaways:
I hope you enjoyed reading and got some value. If you did, a share on the socials would be tremendously appreciated. Questions and comments are welcome below!