Ah The Underrated Meat Grinder!
Welcome back to yet another “how to” blog. As long as you guys request them, I’ll keep doing em! Today we talk about a hugely underrated kitchen appliance: the meat grinder. To my fellow vegetarian readers, feel free to skip this post and check out one of my others instead. To the rest of you meat lovers who own a meat grinder, read on! If you love meat, but don’t own a grinder…..I must ask…..why the hell not!?

Don’t know about you, but tons and tons of recipes I make call for ground or minced meat: lasagna, homemade hamburgers, samosas, spicy beef tacos yada yada yada! I could add another 20 to that list. If you haven’t thought about it already, here’s 4 reasons why you need to get a meat grinder pronto! (infographic created using Venngage)
Word Of Caution—Read This First!
If you own a commercial grade meat grinder, I don’t recommend you sharpen the blades yourself. What you should instead do is pay a professional to get it done. Yes it will cost you $$$, but in the long run it definitely pays off. If you sharpen incorrectly, not only do you risk ruining the plate and blade, but you also risk downtime if the grinder doesn’t run as it should. Take my advice and save yourself the hassle!
What Surfaces Require Sharpening?
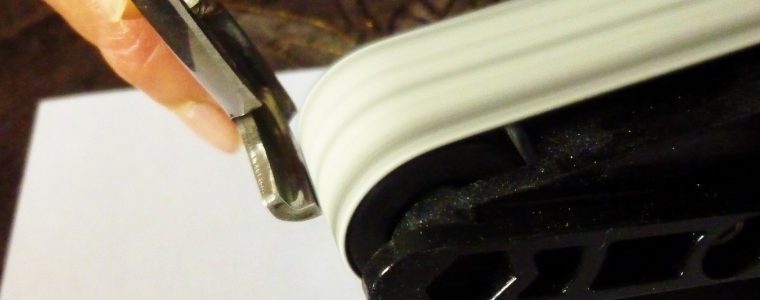
It’s very important to understand what surfaces exactly need to be sharpened. Never jump the gun! Fortunately, meat grinders are pretty simple. If you’ve ever owned and operated one, you should have a good idea of its workings. Basically, there’s 2 things you need to focus on as far as sharpening is concerned: plates and blades.

As far as the plate is concerned, we want to ensure it is completely flat. Strictly speaking, we don’t sharpen the plates, we true or flatten them. Concerning the blade, there are a total of 4 surfaces that require sharpening (see image below). If you look at the surfaces prior to sharpening, you’ll notice all the scratches. Our goal is to get rid of these scratches as best as we can.

Some people mark the surfaces with sharpie, but I typically don’t. It’s more a preference thing if you ask me. Some people like it, and some don’t. If you find it helps you, do it. That’s all i’ll say about that!
More Than One Way To Skin A Cat!
When it comes to sharpening in general, there’s multiple ways to get the job done. More importantly, there is no one right way. Ultimately, it all comes down to the tools at your disposal and what works best for you specifically. Below i’ll go over 2 ways how to sharpen meat grinder blades. This should help drill the idea home that there’s more than one way to skin a cat!
#1 Use A Belt Sharpener (Or Sander)
Not everyone has a belt sharpener, so this method may not be favorable to all. For those who do own one, I highly recommend this approach. I’ll be using my Ken Onion Work Sharp belt sharpener in this example. For those of you who aren’t familiar with this device, it’s basically a knife and tool sharpener that uses belts of various grits to abrade steel. If you’re interested in learning more about it, you can read up on a review I wrote by clicking here. Alright, let’s look at sharpening step by step!
Step 1: Select An Appropriate Grit
I always recommend using a fine grit to begin with. It’s less aggressive and therefore strips off less steel compared to a more aggressive coarse grit. If your blade is extremely dull to the point that it doesn’t slice meat and clogs up the grinder, then and only then should you consider a coarse grit, else pick a fine girt.

Step 2: Observe & Sharpen!
Look closely at the 4 surfaces identified earlier, and take note of any nicks, chips and dings. If the surfaces are heavily scratched up, take note of this too. Remember, our goal is to achieve a mirror finish!
Time to get sharpening! There’s different ways to do this, but i’ll be grabbing my sharpener and using it to abrade one surface at a time. I find it much more comfortable to bring the sharpener to the blade rather than the other way around. I’ll work each surface till there’s pretty much no scratches. I’m aiming to get a clean mirror polish, or something very close to that.


A note about sharpening: there’s no set time unfortunately, and you’ll have to decide when to stop. Observe, sharpen, observe, sharpen, observe, sharpen….and keep going till you get a clean surface free from scratches. If you’re using a coarse belt to start with, you’ll eventually want to change it up to a finer grit. Once you’ve achieved the desired results for one surface, then you can rinse and repeat for the remaining 3 surfaces!

Step 3: Give It A Rinse & Try It Out If Possible!
This 3rd step is optional. The best time to sharpen meat grinder blades is when you actually need to grind meat! Why? Because that way you can test your results right there and then! I find it just works out to be easier. Once you’re done sharpening, you’ll want to give the blade a quick rinse under warm water to get rid of any excess steel. Assemble the blade to the grinder, turn the sucker on, and grind some meat!

How does it work? If done correctly it should run smooth and you should see long spaghetti like strands of meat with consistent thickness. If this is what you observe, awesome! If not, and you still get clogging and inconsistently ground meat, you may wanna revisit step 2, and resharpen.
#2 Use A Sharpening Stone
Any sharpening stone will work fine. For this particular example, I will be using my diamond stones. Diamond stones are great because they require no special setup before use. Other stones in contrast may need to be submerged or lubricated in water or oil before they can be used. I guess it’s just less of a hassle more than anything. Below are the steps I take!
Step 1: Pick A Stone/Grit
Picking the right grit is always critical. I always suggest you pick a fine/extra fine grit. Only pick a coarse stone if you absolutely need to! (example would be if you need to re-profile a surface that’s nicked or chipped) I’ll be using my fine 600 grit stone. If I need to, I’ll repeat all the steps again with an extra fine stone to give it that mirror finish.

Step 2: Sharpen!
You got your stone in one hand, blade in the other….time to get sharpening! I’ve found that a “back and forth” alternating motion works best, so that’s what i’ll follow.

That’s not to say you can’t do circular motions instead. Do whatever feels comfortable and easy to you. I usually do a total of 10 repetitions of “back and forth” per surface. Once you’re done, stop and observe each surface. If it’s clean and free from scratches, no further action required. If it’s not completely free from scratches, consider doing another 10 passes on an extra fine stone.
A Quick Note On Flattening Meat Grinder Plates
As mentioned earlier, we don’t sharpen meat grinder plates, we flatten them. The process is called truing, and it’s really simple. There’s a couple way to do it, but the cheapest and simplest is to use sandpaper. Cut a small piece of coarse sandpaper, and affix to a completely flat surface (like glass or a hardcover book). Why coarse sandpaper this time? Because I’ve found coarse grits work really well for creating a flat, uniform surface.
This time you should mark up both plate surfaces with a sharpie. The sharpie marker will disappear as you abrade the surface against the sandpaper. In essence, it helps you visualize which area has or hasn’t been flattened. Take your sharpie marked plate, place it on the sandpaper and move in quick back and forth motions.
After a couple repetitions, stop and observe the surface. Check to see which areas are still covered in sharpie. These are the area you need to focus on flattening. You have successfully flattened the plate when you see no sharpie marks left!
Consider Sharing This Post If It Helped You!
And that’s my take on how to sharpen meat grinder blades! If you got some value out of this, a share would be hugely appreciated. If you know of a better way to get the job done, leave it in the comments. I always love to hear from you guys. Have an awesome weekend, and happy grinding!