Don’t Chuck Em Out!
Blunt tweezers are a pain….literally! A couple days ago I noticed a strand of white hair darting out from my forehead (gross I know), so what do I do? Grab my tweezers in an attempt to pluck the sucker. What should’ve taken less than 10 seconds, took about 2 minutes. Frustrating to say the least, but that’s not even the worst part. Because they couldn’t grip onto the hair tightly, the tweezers would pull and then slip….ouch! If you’ve experienced this, you’ll know exactly what I mean. As I continued in anguish, I had one of those light bulb moments (okay maybe not quite):
Instead of throwing them out, why not learn how to sharpen tweezers!
")
Believe it or not, but tweezers ain’t exactly what I’d consider cheap. A good pair of stainless steel tweezers will run you about $20 easy. It doesn’t stop there. A pair of precision tweezers is about $30-35. Call me a cheapskate, but there’s no ways I’m dishing out that kind of money. Granted, I probably don’t need anything more than a $10 pair, but hey that’s still $10! $10 I could use for a hot hearty Vietnamese soup to keep me warm on a cold winter night! Back to the topic at hand, why should you sharpen your tweezers?
- Because you save money in the long run. This one’s kinda obvious!
- Because you get to learn a skill in the process that will serve you for the rest of your life!
- Because sending them to get professionally sharpened also drains your wallet!
- Because hair strands sticking out of your forehead (amongst other places on your face) ain’t cool!
If the above 4 reasons aren’t enough to motivate you, I have no hope. In all seriousness though, sharpening tweezers aren’t all that difficult, and you’ll see that as we go through the 3 different methods. But before we look at each of the 3 ways, we need to understand…..what the heck are we sharpening anyways!?
What Exactly Are We Sharpening Anyways?
Before we get into the details of how to sharpen tweezers, it’s important to understand what exactly we are trying to accomplish. What are we sharpening, and how can we test/prove our results? For most tools, this is straightforward. For example, to sharpen a knife, you would sharpen the cutting edge (AKA the part that does the actual cutting) and test for sharpness by slicing through a sheet of paper. It’s not as cut and dried for a pair of tweezers, however. Tweezers don’t necessarily cut anything, so technically there’s no “cutting edge”. Confused yet? Don’t worry it’ll all make sense in the end.

Tweezers grip not cut, and it’s this ability to grip that we aim to restore on our dull pair. As such, saying we are “sharpening tweezers” isn’t exactly correct, because that’s not what we are doing.
So what are we doing? two words: removing imperfections.
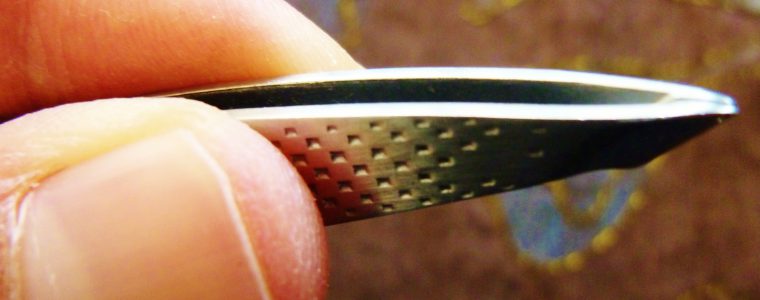
That’s it. Some call it deburring, and others call it realignment. I like to call it removing imperfections. Our goal is remove imperfections from what I like to call the “gripping edge” AKA the 2 surfaces that grip or hold (see image below).


My apologies if I have confused the heck out of you with all that. If you’ve read any of my previous posts, you’ll notice I like to get very detailed, so you know exactly why we do things the way we do. I find this more valuable over simply listing out 3 or 4 ways to get it done. In an attempt to make things simple, whenever I say sharpening tweezers, I really mean removal of minor imperfections. I hope this all makes sense. Alright, let’s get into the nitty gritty!
#1 Use A Leather Strop
If you don’t have a leather strop, any other piece of leather should be fine. If you have an old leather belt kicking around gathering dust, now is the time to bring that bad boy out. Why leather you ask? I use leather for a lot of things: stropping my knives and straight razors are a couple examples. Unlike most abrasives, leather is soft and basically a lot less aggressive. As such, it’s perfect for removing imperfections and polishing a surface.
Important: This method will only work for tweezers that require a quick touch up. Refer to #2 & #3 for extremely dull tweezers.
The actual sharpening process is pretty easy. I’ll break it down into 3 simple steps so it’s easy to understand:
- Step 1—Pinch down on the leather surface, such that both tweezer tips are in full contact. Don’t pinch too hardly….a moderately firm grip will suffice.

Pinch Down With A Firm Grip! - Step 2—While continuing to pinch down on the leather, pull away and outward until both tweezer tips no longer make contact with the leather. It’s easy to rush this…..slow down. Slow, smooth strokes all the way!

Pull Towards You Till Both Tweezer Tips Make Contact - Step 3—Complete the “pinch” and “pull” in steps 1 & 2 a total of 10-15 times. Depending on the condition of your tweezers, you may need to repeat a few more times.
Finally, give it a quick test and see how it plucks. If it does the job, voila….no more awkward face hair! Again, I recommend this method for tweezers that only need a quick touch up. The methods below use a more aggressive abrasive to remove imperfections.
#2 Everyone’s Favorite—Sandpaper!
Sandpaper is one of those things you just gotta have at all times. The fact that it’s versatile means that It can be used for various applications such as knife sharpening, maintaining cutting boards, and even polishing up old or rusted steel. Here’s an awesome write up from Jillee @ onegoodthing that talks about all the different uses for sandpaper. It’s definitely worth checking out!
Before I go any further I’d like to say, both sandpaper or emery cloth will get the job done…..so don’t freak out if all you can get your hands on is emery cloth! What about grit? I always recommend getting a variety of grits, as opposed to just one: coarse, fine, and extra fine is plenty in my opinion. Anyways back to the topic at hand. Let’s talk about how to sharpen tweezers using sandpaper!
The sharpening process is pretty much the same as the leather we talked about in #1. Follow the 3 step process above, but always always always remember to start off with a fine grit….I can’t stress this enough people. If you don’t get results with a fine grit of sandpaper, then switch it up and use a more coarse grit. Don’t jump the gun!
#3 Use An Unglazed Ceramic Mug Or Plate!
Yup, your coffee mug can be quite effective when it comes to restoring dull tweezers. Who would’ve guessed right!? Although, you gotta be careful because this will only work for unglazed ceramic. Most coffee mugs I own are all glazed, so i’ll be using a ceramic plate instead. How does this work? Simple. Ceramic is quite a bit harder than steel, and because of this it’s able to strip/abrade steel when the two come into contact. In fact this is the exact reason why most people use ceramic to sharpen knives (ever heard of ceramic water stones?).

The sharpening process is a little different from the 3 step process described earlier. Here’s what’s worked for me:
- Step 1—Pinch down on the base of the ceramic plate ensuring you have a firm grip.

Start Here! - Step 2—Complete half a circular revolution around the plate. Important to not lose grip in this step!

Do A Half Revolution! 
Complete Another Half Revolution By Tracing Back Up To Where You Began - Step 3—Repeat steps 1 & 2 a total of 5-10 times as required.
And That’s Pretty Much All You Need To Do!
That’s how to sharpen tweezers! Pick your favorite of the 3 methods above, and see how it works. One last thing I almost forgot to mention:
Keep your tweezers clean at all times!
Get in the habit of washing them after every use. Finally, If you want to save a couple more bucks, here’s a post I wrote on sharpening nail clippers. I figure it may be useful to some of you. If you’re interested, give it a read!
I hope you enjoyed reading this post. If you did, consider sharing on the socials. Lastly, if you have any questions, please do not hesitate to get in touch with me. You can either leave a comment below, or send me an email at support@myelectricknifesharpener.com. Thanks for reading. See you in the next one!