You May Never Have To, But If You Do…..
“Why the heck would you even bother sharpening a nail clipper when you can just buy a new one from the dollar store!?” said my buddy after I told him this weekend’s post would be about how to sharpen nail clippers. To which I replied “A penny saved is a penny earned – that’s why I bother”. Every living person owns a nail clipper, and if you’re like most people, you’ve probably gone through your fair share. Now, let’s be honest……buying a replacement is hardly going to put a dent in your wallet! Having said that, this post may or may not be of particular interest to you. If it is and you’re willing to learn, go ahead and read on.

There are several ways to sharpen nail clippers, just as there are tons of ways to sharpen knives. Some methods are quick and easy, and others require you to disassemble the clipper and may take longer. The 3 methods I discuss below have worked well for me over the years, and if done correctly should serve you well also. Alright, without further ado, let’s get right into it!
#1 Bite & Hold Using Sandpaper As An Abrasive
I’ve had much success with this particular method; It’s quick, easy, highly effective, and unlike the other methods, you don’t have to take apart the entire nail clipper. Nail clippers, just like knives have an edge. All edges will dull over time and the rate at which this happens will depend on how frequently it is used. Sandpaper is an awesome abrasive that has many applications as far as sharpening is concerned. I’ve used it to sharpen xacto knives previously, and today I’ll be showing you how to sharpen nail clippers using various sandpaper grits.

First off, if you don’t have sandpaper at home, go get some! It’s easy to find in almost every home or hardware store, and even online. If you’re in Canada like me, head over to Canadian Tire and buy yourself and assorted pack from Mastercraft. For $3.99, you get a coarse grit, a medium grit, a fine grit, and 2 extra fine grits. That’s what I call value for money! Okay, did you get your hands on some? If you did, here’s what you want to do:
- Start with a medium grit – Use the nail clipper to bite into the medium grit the same way you would if you were clipping your nails. With every bite, hold onto the sandpaper for 4 seconds and then release.

Bite Into The Sandpaper And Hold For A Couple Seconds. Repeat The Process Again! - Repeat step 1 for a total of 6-7 times.
- Repeat steps 1 through 2 using both fine and extra fine sandpaper grits. Using a fine grit helps refine and polish the edge, thereby getting rid of any excess steel.
- Give it a rinse under lukewarm water and try it out!
What I love about this method is the fact that it’s a lot less aggressive than some of the others. It removes a very small amount of steel to refine your edge.
#2 Bite & Hold Using Emery Cloth As An Abrasive
This second method is identical to the first one mentioned above, with one exception: abrasive in this case is emery. For those who aren’t familiar, emery is a hard stone that is native to Turkey. Emery cloth and sandpaper have 2 major differences: 1. Emery cloth as the name suggests is emery stone attached to a cloth, whereas sandpaper is backed by paper, and 2. Emery cloth is better suited at finishing metals when compared to sandpaper. Here’s a cool site to check out, if you’re interested in learning more.

Important: both sandpaper and emery cloth will work well. If you can’t get your hands on Emery, don’t freak out! Okay, for this method all you need to do is follow the exact same process as outlined in #1 above. If you don’t have the same grits, that’s fine. Although, you want to ensure you’re moving in the direction of coarse to fine. Remember, the goal is to end up polishing your edge.
#3 Pull Out Your Diamond Stones!
Diamond stones can be used to sharpen just about anything, including your nail clippers. Before we proceed, I’d like to mention the following about this method:
- It Takes More Time Than The Others – This method requires you to take apart your nail clipper. Some nail clippers take less than a minute to take apart, and some could take a while longer.
- It Has The Potential To Remove More Metal – Because it has the potential to remove a lot of steel, I’d recommend using this method for excessively dull nail clippers only.
If you don’t have diamond stones, you’ll want to get your hands on some. Here’s a post I wrote dedicated entirely to diamond stones. You should check it out before continuing on. Alright, so you have your stones out….now what!? Here’s how to sharpen nail clippers using diamond.
Step 1: Take Apart Your Clippers
Rather than trying to explain this by writing, I suggest you check out the video below. Focus on how he disassembles the clipper. He also talks about sharpening, but for our purpose let’s try to understand how he takes the clipper apart only (all credit to Cutlerylover).
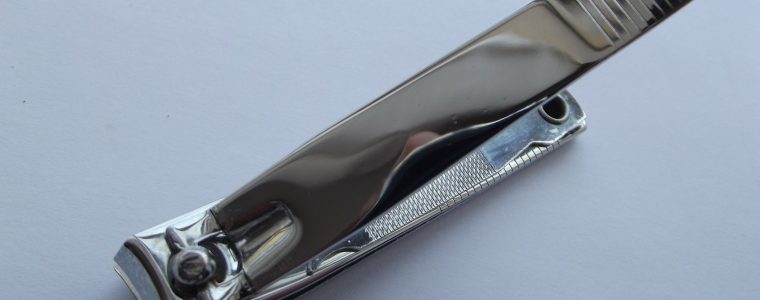
Step 2: Identify Your Edge
Identifying your edge helps you see what part of your tool needs to be sharpened. It helps you visualize what happens every time you use your nail clipper. The picture below identifies my cutting edge. You can see the top and bottom jaws are ground on one side only, with the inner side left flat.

You will also note that the cutting edge on each jaw tends to curve inwards. This concave nature will be very important in the next step, as you will see. For now, you should be aware that not all nail clippers are the same, and because of this they could have slightly different cutting edges.

Step 3: Time To Sharpen Those Nail Clippers!
Step 2 is a vital step because it helps you identify what exactly needs to be sharpened. Now that we know, we can get sharpening. I like to hold the stone in one hand and my clipper in the other, as this allows me to properly work the curved cutting edge. I start off by pushing the jaws together, and then proceed to slowly run my diamond abrasive across from one end to the other.

I repeat this for a total of 10-20 passes depending on how dull my clippers are. Important: Always use a fine stone. Diamond is hard and has the potential to remove steel easily, so it’s important you use a fine or extra fine stone when sharpening nail clippers.
Step 4: Rinse & Give It A Shot!
Once you’re done sharpening, give your clippers a quick rinse and maybe even…..give it a shot! Have an attempt at cutting your own fingernail! Remember to be careful though!
Conclusion: All 3 Have Worked For Me At Some Point!
So that’s how to sharpen nail clippers. The first 2 methods will work well for nail clippers that require a touch up only. The last method is especially good for extremely dull clipper edges. Keep in mind, there’s always more than one way to skin a cat, so expect to see multiple variations on how to sharpen nail clippers. Some people even use foil……If you have an interesting way that works for you, please leave a comment! Otherwise leave me a comment and let me know if you have any specific questions. Lastly, if you got some value from this post, a share would be hugely appreciated! Thanks and see you next week!