Always More Than One Way To Skin A Cat!
A couple years ago I invested in a hair clipper. Truth be told, I was sick of hopping barber shops in the city to find that they mostly all suck (and are ridiculously overpriced!). They lure you in by giving you an awesome first haircut, and everything after looks like grandma did it. Now look I’m not bashing barbershops…I just think many of them (at least where I live) aren’t good at what they do. There’s no passion! My point: it’s worth investing in clippers to cut your own hair. Why? You’ll save a ton of money, and in time you’ll be able to give yourself some really cool haircuts!

Back to the topic at hand, sharpening clipper blades! As is the case with sharpening in general, there’s many different ways to sharpen clipper blades. Some people use stones, others use rods, and some even use foil. In this post I’ll go over 2 of my favorite methods!
Are You Sure You Need To Sharpen?
That’s the first question you should be asking yourself. Nine times out of ten your clipper blades aren’t actually dull, and don’t need to be sharpened. The reason it’s not cutting smoothly could be because:
It’s Filled With Crap!
When was the last time you removed and cleaned the gunk from your blades? Also, notice all the crap in the little crevice where the blades sit? Yeah, you need to make sure all of that is clean!

Did You Lubricate?
Moving parts will eventually give way to friction. In the case of your blades, they will stop cutting smoothly. This can be resolved by simply lubricating with oil.

Do You Use Them For Dog Grooming?
If you use clippers to groom your dog, expect that they will dull much faster than usual. Remember, dog fur/hair is nowhere near the same as human hair. It’s quite a bit thicker and coarser, and will therefore dull an edge much quicker.

So chances are you don’t really need to sharpen your clipper blades! Give them a thorough wash under hot water, towel dry, apply a generous coating of oil, and they should run fine again.
How To Sharpen Clipper Blades (2 Different Ways!)
Prior to sharpening, you’ll want to ensure the blades are 100% clean and free from dirt and debris. A hot soapy water wash will usually do the trick, although you may sometimes have to soak in vinegar (if your blade is very dirty).
Important: if your blades are rusted, don’t sharpen. Get rid of the rust first!
Here’s a post I wrote on rust removal. I encourage you to check it out. Alright, time to sharpen……here’s 2 ways how!
#1 Use Fine & Extra Fine Diamond Stones
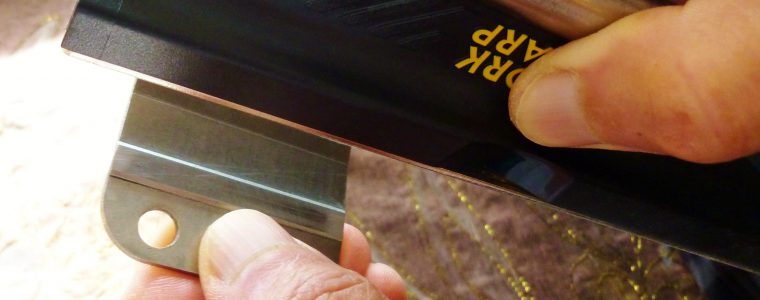
One thing I love about sharpening stones is how versatile they are. I’ve used mine to sharpen just about anything from nail clippers to x-acto knives, and today I’ll be showing you how to sharpen clipper blades. I’ll be using my Work Sharp diamond stones. For those who are interested, here’s a review I wrote about them.

***CLICK HERE TO CHECK IT OUT ON AMAZON***
First things first, I recommend only using fine and extra fine grits when sharpening clipper blades. I stay away from coarse grits because they will remove more steel than required. If you don’t own a set of fine/extra-fine diamond stones, don’t fret. Any other stone (water/oil) type should suffice. Also, I typically don’t lubricate my stones before sharpening, but that’s not to say you can’t. In fact, if you’re using a water stone you’ll want to lubricate with water before sharpening. Below I go through the process step by step!
Step 1: Detach The 2 Blades From The Clipper
You’ll need a screwdriver to unbolt the blades from the clipper. There should be 2 blades in total: a small one and a large one.

Once you have them disconnected, you’ll want to give both blades a thorough rinse to remove any dirt or debris.
Step 2: Take Your Blades And Examine Em!
By now your blades should be free from dirt, and therefore easy to inspect. Take a closer look and try to understand what exactly needs to be sharpened. This can be a little confusing especially if it’s your first time sharpening. Understanding how clippers work will help you visualize what needs to be sharpened. Watch the video below before you do anything (all credit to ExpalinFull).
Notice how the 2 blades move from side to side? Based on this, what do you think needs to be sharpened? I’ll give you a hint….think friction! We will be sharpening the 4 surfaces on each blade that constantly slide against each other during operation (see image below).

Step 3: Time To Sharpen!
We’ve identified the 4 surfaces in step 2, so now it’s time to sharpen! The process of sharpening is straightforward. I position the blade such that the surface being sharpened fully touches the stone. Once it is, simply push forward and backward against the stone to abrade steel. Simple back and forth motions….that’s all! I’ll do it a total of 10 times per surface. Front, back, front, back, front, back…..10 times! I’ll start off on a fine grit stone. Make sure you do this for all 4 surfaces! (2 on each blade).


Step 4: Repeat Using An Extra Fine Stone (Optional)
I usually repeat everything in step 3, but on an extra fine grit (10 passes in total). Polishing on an extra fine grit cleans up the blade real nice. If you don’t have an extra fine stone, you can skip this step.
Step 5: Pause, And Do A Quick Check!
Once you’ve done 10 passes, stop and do a quick check. Observe your blades, and run your finger across the edge. A restored clipper blade usually tends to shine after being sharpened, more importantly it should be flat. At this point you can rinse both blades, bolt back to the clipper, and give it a quick test run. If I don’t need a haircut, i’ll try it out on my arm. The big question: does it cut smooth and easy, or is it choppy and rough? If it’s the latter, do another 10 passes and check again. If it works well, remember to lubricate with oil before you reassemble everything!

#2 Use Emery Cloth Or Sandpaper
You can still restore clipper blades even if you don’t have sharpening stones. You’ll need to pay a visit to your local hardware store to get your hands on some fine and extra fine grit emery cloth or sandpaper. The sharpening process remains the exact same as discussed above. Same back and forth motion done 10 times on fine, and another 10 times on the extra fine grit.
Important: affix your sandpaper to a flat surface. Large hard cover books have served me well for this purpose previously.
3 Things You Should Be Thinking About Before Sharpening!
#1 Have You Considered Paying A Sharpening Service?
Not everyone cares to know how to sharpen clipper blades. Some would rather pay to have a professional take care of it. There’s absolutely nothing wrong with this! My preference is to do it myself, but it’s ‘s not only about saving $$$. If you’ve sharpened anything before, you’ll know how awesome it feels to restore an edge. Nothing quite like it! If you decide to get your blades sharpened by a professional, make sure you find the best one. You should be able to find professional sharpeners both locally and across the globe. Pick wisely!
#2 Thought About Blade Replacement?
Another thing to consider is blade replacement. In most cases, it’s not ideal and probably not required. However, sometimes a blade is so badly damaged/rusted, that replacement is necessary. Again, the only way you’ll be able to tell is when you examine the blade. Important: if you do end up considering a replacement blade, only buy originals from the manufacturer. Avoid generics and cheap knock-offs!
#3 Get Yourself Some Stones!
If you don’t have any, now would be the perfect time to invest in some sharpening stones! Why? Because they can be used to sharpen just about anything! I prefer diamond stones because they’re low maintenance (no need to flatten, no need to lubricate). I recently wrote an entire post on diamond stones (considerations, recommendations, how to use….the works). I encourage you to give it a read. Click here to check it out!
I Hope You Found This Useful!
That’s my take on how to sharpen clipper blades. I hope you got some value out of this post. If you did, a share would be appreciated. Finally, if you have any questions, please do not hesitate to leave me a comment. Cheers and have an awesome Sunday!