Dull Drill Bits Are A Nuisance!
Don’t know what’s worse….a dull drill bit or a dull knife. The more I think about it, I’d rather have a dull knife over a dull drill bit any day. And maybe that’s because I have a whole army of knives (all sharp) ready for action, in comparison to the 7 or 8 drill bits scattered around in my garage. Sharpening knives by hand…..now that’s something I enjoy. Call me crazy, but I find it has a therapeutic feel to it! Sharpening drill bits by hand? I’ve attempted it a couple times, and it’s not something I enjoy. Truth be told, I kinda hate it….and while we’re being honest, I kinda suck at it too.
What tool(s) do you detest sharpening/restoring the most, and why? Leave it in the comments!
Sharpening drill bits by hand on a grinder calls for some solid experience and technique, and I have neither. Why are drill bits so much harder to sharpen than knives? In my opinion, it has to do with the complex geometry of a drill bit. If you’re reading this at home, go to your garage and grab a twist drill bit you have lying around. Then watch the video (all credit to MECH 4 mechs) below!
If you watched the video, you’ll have realized just how complicated a drill bit really is, and that’s why sharpening one freehand can be quite the challenge. Not saying you can’t learn the ropes though. There are some great video tutorials online that show exactly how it’s supposed to be done. That being said, my personal preference is to use a sharpener. It’s easier (once you get the hang of it), quicker, and doesn’t take up a lot of space. Below I share with you my best drill bit sharpener!
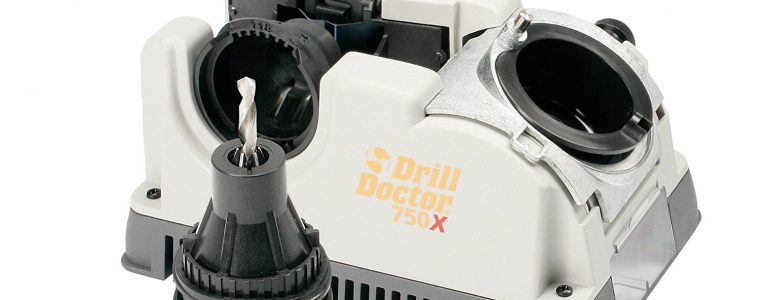
Drill Doctor 750X: The Best Drill Bit Sharpener You Can Find Today!
If you’re looking for a noncommercial sharpener, you will not find any better than the Drill Doctor 750X. As far as Drill Doctors are concerned, the 750X is the crème de la crème. Yes you do pay a premium price, but what you get in return is an incredibly high quality product. Here’s what I like and dislike about it!

***CLICK HERE TO CHECK IT OUT ON AMAZON***
What I Love! (The Good)
Much Easier Than Sharpening By Hand!
Sharpening a drill bit using the 750X is far simpler, and quicker than doing it by hand. One thing that immediately stood out to me during first use is that literally anyone can use this. The only thing you need to do is follow instructions and watch the “how to” videos on Drill Doctor’s site (here’s the one for the 750X). After that, it’s just a matter of plugging in the device and following the steps. It’s a simple 2 step (align and sharpen) process, that best of all requires no technique, no steady hands, and no guesswork. And this is probably what I love most about this device!
Step 1: Align The Bit
Aligning the drill bit is a prerequisite to sharpening. It ensures that we set the correct angle, and geometry prior to removing metal in sharpening. The process involves placing the bit into a chuck, and inserting the chuck into the alignment port.


Step 2: Sharpening
Once you’ve finished step 1 you can breathe easy, because step 2 is a walk in the park! Sharpening an aligned bit is foolproof. You take the chuck (with the bit in it of course!) and align its sharpening guide to the cam guide on the sharpening port. Ensuring the cam and cam guide are always in contact, rotate the chuck clockwise one half cycle from sharpening guide to sharpening guide i.e. white mark to white mark. You should always do an even number of half turns/cycles. I’ll be doing 4 half turns.


Step 3: Split The Point (Optional)
This is an optional step that results in a more centered bit. More about split points below!
You Can Split The Point!
The 750X allows you to create split points. When we say split the bit’s point, all we’re doing is adding extra cutting edges/lips to the bit. Now you’re probably wondering what all the fuss is about, and why we do this. Split points drastically improve a bit’s performance. The extra cutting edges result in almost immediate cutting/drilling into material. In other words, the bit works extra hard so you don’t have to! Split point drill bits remain centered both before and during the cutting process. Dull bits, on the other hand wander and walk. With a split point bit, you drill quicker, require less effort, and can make almost perfect holes. The video below explains the difference between a traditional vs split point bit (all credit to Greenfield Industries).
The Ability To Customize
Earlier I spoke about how simple this device is to operate; 2 step process that even a 5 year old can follow! But that doesn’t mean you can’t go crazy and start really tweaking your bits! If you’re experienced and drill professionally, maybe you want a little more than the weekend DIY hobbyist. The 750X affords you this freedom. You can alter bit point angles anywhere from 115 to 140 degrees.


More importantly, you can adjust relief and chisel angles. Both of these parameters will change your drill’s performance. Increase your relief angle, and your bit will cut more quickly and aggressively into material. Decrease the relief and chisel angle, and you get more controlled drilling. Personally, I haven’t had too much of a chance to experiment on all these extra features just yet, but ask me in a couple months! If any of you guys already own the 750X, let me know how it’s working for you. Leave a comment!
Easy To Clean And Maintain
The more you sharpen, the more you’ll need to clean. Over time, metal particles will accumulate everywhere inside the device. Cleaning the 750X is simple and quick. I use a microfiber cloth to wipe off any residue that may have collected during sharpening. I typically do this for the alignment and sharpening port, and occasionally I’ll remove the sharpening wheel and brush it lightly to get rid of dust and debris.

The diamond sharpening wheel will need to be replaced at some point in time, as it will eventually wear. Removing and replacing the wheel is straightforward.

The Awesome Customer Service Experience!
Whatever happen to good ol’ customer service!? Everyone seems to have forgotten, but not these guys. I went over to Drill Doctor’s site to see if I could find answers to my questions, and what started as checking out FAQs quickly escalated to a live chat session, followed by a 15 min phone call! By the end of it, all my questions/concerns were addressed. Customer service is a massive deal for me. Knowing there’s someone I can speak to not only for warranty concerns, but also for general operation is huge!
What I Don’t Quite Love! (The Bad)
Larger Bits Take Long To Sharpen
The larger the bit, the more half turns you need to complete in the sharpening port. For a 1/2” bit, you need a minimum of 40 half turns. This can become quite exhaustive, and I’d probably mess up counting after 20! This isn’t a showstopper by any means, but rather a small annoyance.
Limited To Twist And Masonry Bits
The 750X can only work on twist and masonry style bits. If you have other bit geometries/styles, you’ll most likely need to sharpen freehand on a grinder, or simply buy replacements.
Honorable Mentions! (350X, XP2, & 500X)
In my opinion, the best drill bit sharpener (for home use) you can find today is the 750X. It outclasses everything else by a mile. The downside is it isn’t cheap, and the reality is that most people won’t be able to afford it (click here to check latest pricing on amazon). For these people, I recommend Drill Doctor’s three budget alternatives: 350X, XP2, and 500X.
350X – Simple, Affordable, And Gets The Job Done!
A budget sharpener for the DIY occasional hobbyist. It can sharpen twist and masonry bits sized from 3/32” to 1/2”. It will only sharpen point angles to 118 degrees, and you don’t have the ability to adjust chisel and relief angles. Can’t split the point either. Overall, a very basic sharpener best suited for folks who only use their hand drill a couple times a year.

***CLICK HERE TO CHECK IT OUT ON AMAZON***
XP2 – A Notch Higher Than The 350X
Take the 350X and step it up a notch…this is the XP2. It can do everything the 350X can, and then some:
- Chisel and relief angles can be adjusted. As mentioned previously, adjusting these parameters will affect your drill’s performance (aggressive versus controlled).
- It can split the point.
- It can sharpen 3/4” drill bits if you purchase the extra chuck.
Important: It will not sharpen anything other than 118 degrees.

***CLICK HERE TO CHECK IT OUT ON AMAZON***
500X – For The Serious DIY Professional!
As mentioned above, the 350X and XP2 are 2 very good choices for anyone who doesn’t drill much. If you’re a serious professional who drills into woods, and metals frequently, then the two devices you should consider are 500X and 750X. The 500X does everything the 750X does, with a few exceptions:
- It can do point angles ranging from 118-135 degrees. 750X has a larger range (115-140 degree point angles).
- It can sharpen 3/4” bits if you purchase the optional chuck. The 750X uses a single chuck for all bits (3/32”-3/4”).
- You can’t adjust the amount of material taken off. This feature is available in the 750X, where you can adjust the material take off knob to remove more or less material from the tip.

***CLICK HERE TO CHECK IT OUT ON AMAZON***
Here’s 5 Things To Consider Before Buying A Drill Bit Sharpener
#1 Know Your Drill Bits!
It is absolutely imperative you understand your drill bits before you attempt to sharpen them. Here’s 3 things to determine before you start shopping for the best drill bit sharpener:
Material Type
In case you didn’t know, drill bits are available in a variety of different materials. The most common I’ve seen are high speed steel (HSS), cobalt, titanium nitride coated (TiN-coated), and masonry. Each one is suited for specific applications. For example, HSS is great for drilling into woods, whereas masonry, with its extremely hard carbide insert is great for drilling into concrete.
")
Why is it important to know bit material type? Simple. Not every sharpener is equipped with an abrasive that can handle ALL materials. It’s up to you to find out if the sharpener can handle your bit material.
Size
Just like material above, drill bits come in different sizes, and every sharpener has a range of sizes it can work on. What are your drill bit sizes? Knowing this will help you pick a suitable sharpener.

Geometry Type
There are tons of different drill bits, and they each have a different geometry and cutting edge. The most common is the twist drill bit. This is also the only bit type that most sharpeners will work on. If you have a different geometry, you may have no choice but to sharpen by hand.

#2 What Are You Willing To Spend?
Having a budget in mind beforehand is always a good idea. You can find non electric drill bit sharpeners for as cheap as $30. On the contrary, you can find electric ones for $140 and upwards. If you’re a hobbyist or a do it yourself type, you may not see the value in spending more than a $100. The opposite is true for a professional. What are you willing to spend?
#3 Have You Considered The Alternatives?
Do you really need a drill bit sharpener? Don’t jump the gun and buy something on an impulse. If you find yourself spending tons of cash on replacement drill bits and have piled a collection over the years, you ought to consider getting a sharpener. On the contrary if you find yourself drilling once or twice a year, don’t waste your money on a sharpener. Buy replacement bits, and get the job done. If you’re a daredevil who happens to own a bench grinder, watch YouTube videos and learn how to sharpen by hand! Have you seriously considered the alternatives?
#4 Point Angles And Why They’re So Important
If you watched the video at the beginning, you’d know what a point angle is. Point angle is simply the angle at the point of the tip. The 2 most common angles used are 118 and 135 degrees. A 118 degree angle is generally more aggressive and is typically used to cut into soft materials such as woods, and soft steels. Use it on harder materials, and it will dull fast. A 135 degree angle cuts slower, and is best suited for cutting into hard materials such as hard steels, concrete, and blocks.

Why is all this important? It all ties into what materials you drill/cut. For example, the only time I’ve used my drill is when I need to drill wood (for some DIY home project). Therefore, I only care about 118 degrees, and as such I’ll find a sharpener capable of doing this point angle. If on the other hand you drill through hard materials, such as concrete, hardened steel etc., you need to be sure the sharpener you choose can do 135 degree point angles. It all comes down to what materials you’re working on!
#5 Other Considerations – Voltage & Warranty
If you’re looking for a sharpener, chances are you’ll end up purchasing one that’s electric such as the Drill Doctor. Voltage becomes especially important for those who don’t live in the United States or Canada. It’s not as simple as using an adapter, since the devices are designed to be used at a certain frequency. Also, using an adapter may potentially void your warranty (true for Drill Doctor).
If you live outside of the US and Canada, purchase a device that matches your countries electrical ratings.
Warranty is also important. Because these devices are mostly electrical in nature, they are more likely to fail compared to non-electrical bit sharpeners. Look for devices that have more than one year coverage, and are from a reputable manufacturer. You may also wish to investigate the option of purchasing an extended warranty.
Pick What Works For You!
By now you know what to consider before getting a drill bit sharpener. I’ve shared with you my best drill bit sharpener, along with 3 other awesome recommendations. Why am I only recommending Drill Doctor? Simply because everything else comes nowhere close.
If you decide to buy a drill bit sharpener for non commercial use, I strongly suggest you consider a Drill Doctor!
I’ll reiterate what I said earlier in the post: you don’t need to buy a bit sharpener to restore your dull bits. Your alternatives are:
- Learn how to sharpen on a bench grinder. This can be done either freehand, or by using a pre-assembled jig.
- Toss out your dull bits, and buy new ones.
For those of you who are interested in learning how to sharpen freehand, here’s a video to help get you started (all credit to mrpete222).
If you got some value out of this post, please share! Finally, lets get a discussion going below. Leave me a comment and tell me what you think is the best way to restore dull drill bits!
This tool will be SO beneficial at my job. We are always burning our drill bits out and end up buying new ones. With this we wouldn’t have to do that. Sometimes we sharpen by hand but that’s just too time consuming so I’ll be getting one of these. Thanks!
Thanks for leaving a comment Brandon. Great choice! They’re awesome!
Thanks for the informative post! Certainly helps to hear from someone who has actually reviewed the 750X.
Appreciate the comment Kwacha. Thanks for reading!
I’ve been interested in the Drill Doctors for a while now, and this really does help put things into perspective. Also appreciate the considerations! Very helpful!
You’re very welcome Craig. I’m glad you enjoyed reading. Cheers!